Sunday, August 21, 2011

ARDUINO CODE FOR LED MATRIX SCROLLING DISPLAY

Posted by rinson

/*
  Arduino 56x8 scrolling LED Matrix

Scrolls any message on up to seven (or more?) 8x8 LED matrices.
Adjust the bitmap array below to however many matrices you want to use.
You can start with as few as two.
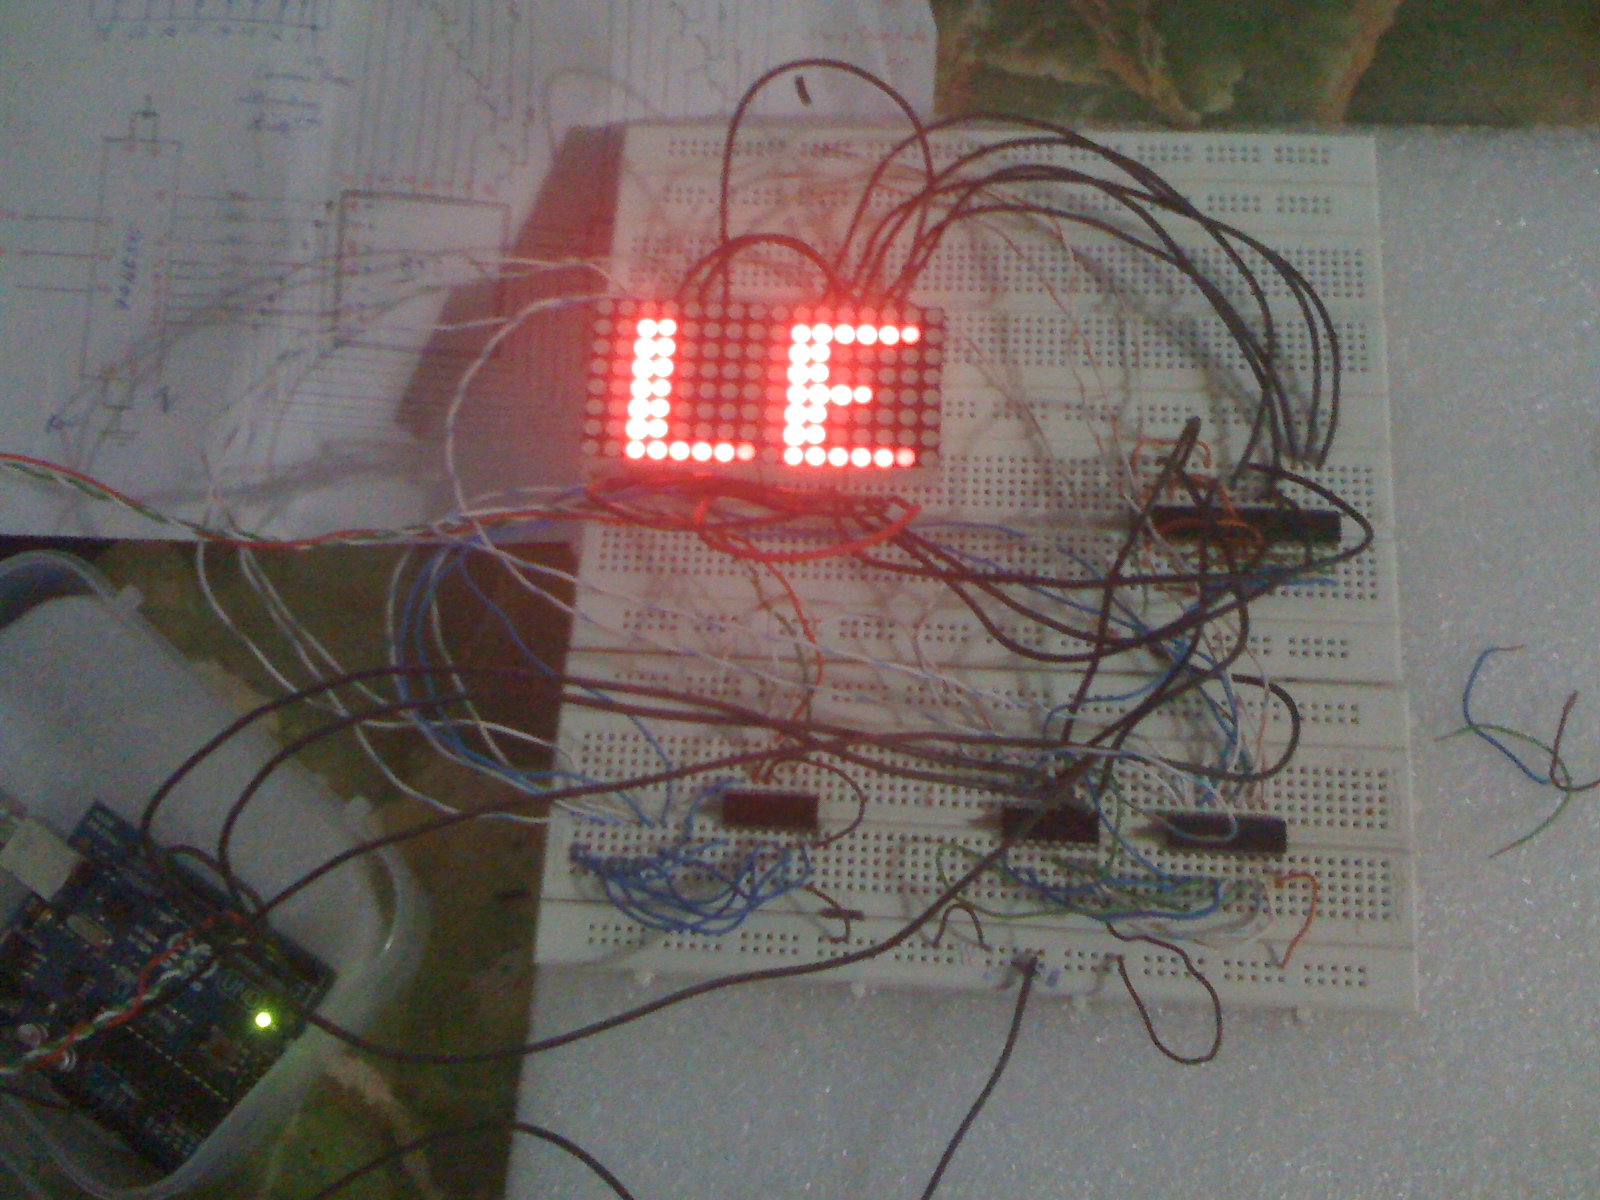
The circuit:
* 1 8-bit shift register (SN74HC595) to drive the rows of all displays.
* N power 8-bit shift registers (TPIC6C595) to drive the columns (1 chip per display)
* N 8x8 LED matrix display (rows=Anodes, cold=cathodes)
* N * 8 470ohm resistors, one for each column of each display
* 1 10K resistor
* A big breadboard, or several small ones
* Lots and lots of wires. AT LEAST 16 wires for each display.
* If you plan on driving more than 8 displays, you should add 8 transistors to drive the rows because
potentially you would be lighting up the whole row at one time (56 LEDs at once in my case, 8*n in your case)

Wiring tips:
* Key to success is to put the chips on the left and/or right of the matrix rather than above or below.
This would allow you to run wires above and below the matrix without covering any of them.
* I used several power bus breadboard strips above and below the matrix so all row wires never has to cross the matrix.
* Wire up each matrix one at a time, turning on the Ardunio to verify your work before proceeding to the next matrix.
Correcting your work after you have 32 wires over it is very difficult.


*/
// I kept these version notes to show you that it doesn't just all magically happen.  I start simple and keep adding more.
//v01 - Just see if we can drive one matrix, one dot at a time.  Forget multiplexing for now.
//v02 - All three displays show same pattern because they are all tied to same data line.
//v03 - Second and third 595 inputs are tied to outputs of previous, so now shiftout three bytes instead of one.
//v04 - Let's multiplex.  This version has no bleeding, but still flickers quite a bit.
//v05 - Flicker is reduced by using delayMicroseconds() instead of delay().  Flipping both latches HIGH at same time increases brightess of all LEDs.
//v06 - let's animate! (none of this code is in v09, I removed them because they're unrelated to the marquee.
//v07 - We got a scrolling message marquee!
//v08 - Now with SEVEN matrices! 56x8 pixels
//v09 - Add comments and remove experimental code
//v10 - Fixed search and replace error in Plot.  Thanks to Capacea for catching this error.

//-- Columns (Negative Cathodes) --
int latchPin1 = 2; //Arduino pin connected to Green 10 RCK of TPIC6C595
int clockPin1 = 3; //Arduino pin connected to Yellow 15 SRCK of TPIC6C595
int dataPin1 = 4;  //Arduino pin connected to Blue 2 SER IN of TPIC6C595

//-- Rows (Positive Anodes) --
int latchPin2 = 5; //Arduino pinn connected to Green Latch 12 ST_CP / RCK of 74HC595
int clockPin2 = 6; //Arduino pin connected to Yellow Clock 11 SH_CP / SCK of 74HC595
int dataPin2 = 7;  //Arduino pin connected to Blue Data 14 DS / SI of 74HC595

//=== B I T M A P ===
//Bits in this array represents one LED of the matrix
// 8 is # of rows, 7 is # of LED matrix we have
byte bitmap[8][7]; // Change the 7 to however many matrices you want to use.
int numZones = sizeof(bitmap) / 8; // I will refer to each group of 8 columns (represented by one matrix) as a Zone.
int maxZoneIndex = numZones-1;
int numCols = numZones * 8;

//=== F O N T ===
// Font courtesy of aspro648
/
// First char is @, next is A, B, etc.  Only lower case, no symbols.
// The @ will display as space character.
byte alphabets[][5] = {
  {0,0,0,0,0},
  {31, 36, 68, 36, 31},
  {127, 73, 73, 73, 54},
  {62, 65, 65, 65, 34},
  {127, 65, 65, 34, 28},
  {127, 73, 73, 65, 65},
  {127, 72, 72, 72, 64},
  {62, 65, 65, 69, 38},
  {127, 8, 8, 8, 127},
  {0, 65, 127, 65, 0},
  {2, 1, 1, 1, 126},
  {127, 8, 20, 34, 65},
  {127, 1, 1, 1, 1},
  {127, 32, 16, 32, 127},
  {127, 32, 16, 8, 127},
  {62, 65, 65, 65, 62},
  {127, 72, 72, 72, 48},
  {62, 65, 69, 66, 61},
  {127, 72, 76, 74, 49},
  {50, 73, 73, 73, 38},
  {64, 64, 127, 64, 64},
  {126, 1, 1, 1, 126},
  {124, 2, 1, 2, 124},
  {126, 1, 6, 1, 126},
  {99, 20, 8, 20, 99},
  {96, 16, 15, 16, 96},
  {67, 69, 73, 81, 97},
};

//=== S E T U P ===

void setup() {
  pinMode(latchPin1, OUTPUT);
  pinMode(clockPin1, OUTPUT);
  pinMode(dataPin1, OUTPUT);

  pinMode(latchPin2, OUTPUT);
  pinMode(clockPin2, OUTPUT);
  pinMode(dataPin2, OUTPUT);

  //-- Clear bitmap --
  for (int row = 0; row < 8; row++) {
    for (int zone = 0; zone <= maxZoneIndex; zone++) {
      bitmap[row][zone] = 0;
    }
  }
}

//=== F U N C T I O N S ===

// This routine takes whatever we've setup in the bitmap array and display it on the matrix
void RefreshDisplay()
{
  for (int row = 0; row < 8; row++) {
    int rowbit = 1 << row;
    digitalWrite(latchPin2, LOW);  //Hold latchPin LOW for as long as we're transmitting data
    shiftOut(dataPin2, clockPin2, MSBFIRST, rowbit);   //Transmit data

    //-- Start sending column bytes --
    digitalWrite(latchPin1, LOW);  //Hold latchPin LOW for as long as we're transmitting data

    //-- Shift out to each matrix (zone is 8 columns represented by one matrix)
    for (int zone = maxZoneIndex; zone >= 0; zone--) {
      shiftOut(dataPin1, clockPin1, MSBFIRST, bitmap[row][zone]);
    }

    //-- Done sending Column bytes, flip both latches at once to eliminate flicker
    digitalWrite(latchPin1, HIGH);  //Return the latch pin high to signal chip that it no longer needs to listen for information
    digitalWrite(latchPin2, HIGH);  //Return the latch pin high to signal chip that it no longer needs to listen for information

    //-- Wait a little bit to let humans see what we've pushed out onto the matrix --
    delayMicroseconds(500);
  }
}

// Converts row and colum to actual bitmap bit and turn it off/on
void Plot(int col, int row, bool isOn)
{
  int zone = col / 8;
  int colBitIndex = col % 8;
  byte colBit = 1 << colBitIndex;
  if (isOn)
    bitmap[row][zone] =  bitmap[row][zone] | colBit;
  else
    bitmap[row][zone] =  bitmap[row][zone] & (~colBit);
}

// Plot each character of the message one column at a time, updated the display, shift bitmap left.
void AlphabetSoup()
{
  char msg[] = "DJANGO INDIANS";

  for (int charIndex=0; charIndex < (sizeof(msg)-1); charIndex++)
  {
    int alphabetIndex = msg[charIndex] - '@';
    if (alphabetIndex < 0) alphabetIndex=0;
 
    //-- Draw one character of the message --
    // Each character is only 5 columns wide, but I loop two more times to create 2 pixel space betwen characters
    for (int col = 0; col < 7; col++)
    {
      for (int row = 0; row < 8; row++)
      {
        // Set the pixel to what the alphabet say for columns 0 thru 4, but always leave columns 5 and 6 blank.
        bool isOn = 0;
        if (col<5 1="1" 7-row="7-row" alphabetindex="alphabetindex" alphabets="alphabets" col="col" ison="bitRead(" p="p">        Plot( numCols-1, row, isOn); // We ALWAYS draw on the rightmost column, the shift loop below will scroll it leftward.
      }
   
      //-- The more times you repeat this loop, the slower we would scroll --
      for (int refreshCount=0; refreshCount < 10; refreshCount++)
        RefreshDisplay();

      //-- Shift the bitmap one column to left --
      for (int row=0; row<8 p="p" row="row">      {
        for (int zone=0; zone < numZones; zone++)
        {
          // This right shift would show as a left scroll on display because leftmost column is represented by least significant bit of the byte.
          bitmap[row][zone] = bitmap[row][zone] >> 1;
       
          // Roll over lowest bit from the next zone as highest bit of this zone.
          if (zone < maxZoneIndex) bitWrite(bitmap[row][zone], 7, bitRead(bitmap[row][zone+1],0));
        }
      }
    }
  }
}

//=== L O O P ===

void loop() {
  AlphabetSoup();
}
Read More

8*8 led matrix connection digram

Posted by rinson
Above shows the connection digram of the led matrix using two shift registers 74hc595  this shift registers have three inputs from the arduino
clock
 lath
data

Read More

Saturday, August 20, 2011

led matrix display using arduino

Posted by rinson 2 Comments
Read More

led matrix scrolling display

Posted by rinson

Read More

Saturday, April 2, 2011

Project 1 – LED Flasher – Code Overview

Posted by rinson

Open up your Arduino IDE and type in the code from Listing 2-1.
Listing 2-1. Code for Project 1
// Project 1 - LED Flasher
int ledPin = 10;
void setup() {
pinMode(ledPin, OUTPUT);
}
void loop() {
digitalWrite(ledPin, HIGH);
delay(1000);
digitalWrite(ledPin, LOW);
delay(1000);
}
Press the Verify/Compile button at the top of the IDE to make sure there are no errors in your code.
If this is successful, click the Upload button to upload the code to your Arduino. If you have done
everything right, you should now see the red LED on the breadboard flashing on and off every second.
Let’s take a look at the code and the hardware to find out how they both work.
Read More

Project 1 – LED Flasher

Posted by rinson

You are now going to work your way through the first four projects. These projects all use LED lights in
various ways. You will learn about controlling outputs from the Arduino as well as simple inputs such as
button presses. On the hardware side, you will learn about LEDs, buttons, and resistors, including pull
up and pull down resistors, which are important in ensuring that input devices are read correctly. Along
the way, you will pick up the concepts of programming in the Arduino language. Let’s start with a “Hello
World” project that makes your Arduino flash an external LED


For the first project, you are going to repeat the LED blink sketch that you used during your testing stage.
This time, however, you are going to connect an LED to one of the digital pins rather than using LED13,
which is soldered to the board. You will also learn exactly how the hardware and the software for this
project works, learning a bit about electronics and coding in the Arduino language (which is a variant of
C) at the same time.


Parts Required
Breadboard
5mm LED
100 ohm Resistor*
Jumper Wires

Connecting Everything


First, make sure your Arduino is powered off by unplugging it from the USB cable. Now, take your
breadboard, LED, resistor, and wires and connect everything as shown in Figure 2-1.


It doesn’t matter if you use different colored wires or use different holes on the breadboard as long
as the components and wires are connected in the same order as in the picture. Be careful when
inserting components into the breadboard. If your breadboard is brand new, the grips in the holes will
be stiff. Failure to insert components carefully could result in damage.
Make sure that your LED is connected correctly with the longer leg connected to Digital Pin 10. The
long leg is the anode of the LED and must always go to the +5v supply (in this case, coming out of Digital
Pin 10); the short leg is the cathode and must go to Gnd (ground).
When you are sure that everything is connected correctly, power up your Arduino and connect the
USB cable.


Read More

Upload Your First Sketch

Posted by rinson

Now that you have installed the drivers and the IDE and you have the correct board and ports selected,it’s time to upload an example sketch to the Arduino to test that everything is working properly before
moving on to the first project.
First, click the File menu (Figure 1-10) and then click Examples.

SELECT A PROGRAM BLINK IN EXMPLE
Next, click the Upload button (sixth button from the left) and look at your Arduino. (If you have anArduino Mini, NG, or other board, you may need to press the reset button on the board prior to pressingthe Upload button.) The RX and TX lights should start to flash to show that data is being transmittedfrom your computer to the board. Once the sketch has successfully uploaded, the words “Doneuploading” will appear in the IDE status bar and the RX and TX lights will stop flashingAfter a few seconds, you should see the Pin 13 LED (the tiny LED next to the RX and TX LEDs) start

to flash on and off at one second intervals. If it does, you have just successfully connected your Arduino,installed the drivers and software, and uploaded an example sketch. The Blink sketch is a very simplesketch that blinks LED 13 shown in Figure 1-12, the tiny green (or orange) LED soldered to the board(and also connected to Digital Pin 13 from the microcontroller).Before you move onto Project 1, let’s take a look at the Arduino IDE. I’ll explain each part of the
program.


Read More

Getting Started with Arduino

Posted by rinson

This section will explain how to set up your Arduino and the IDE for the first time. The instructions forWindows and Macs (running OSX 10.3.9 or later) are given. If you use Linux, refer to the Getting Startedinstructions on the Arduino website at www.arduino.cc.playground/Learning/Linux. I will also presumeyou are using an Arduino Uno. If you have a different type of board, such as the Duemilanove (see Figure
1-4), then refer to the corresponding page in the Getting Started guide of the Arduino website.You will also need a USB cable (A to B plug type) which is the same kind of cable used for mostmodern USB printers. If you have an Arduino Nano, you will need a USB A to Mini-B cable instead. Donot plug in the Arduino just yet, wait until I tell you to do so.


Next, download the Arduino IDE. This is the software you will use to write your programs (orsketches) and upload them to your board. For the latest IDE go to the Arduino download page athttp://arduino.cc/en/Main/Software and obtain appropriate the version for your OS.


Windows XP Installation
Once you have downloaded the latest IDE, unzip the file and double-click the unzipped folder to open it.You will see the Arduino files and sub-folders inside. Next, plug in your Arduino using the USB cable andensure that the green power LED (labeled PWR) turns on. Windows will say “Found new hardware:Arduino Uno” and the Found New Hardware Wizard will appear. Click next and Windows will attempt toload the drivers.This process will fail. This is nothing to worry about; it’s normal.Next, right-click on the My Computer icon on your desktop and choose Manage. The Computer
Management window will open up. Now go down to Event Manager in the System Tools list and click it.In the right hand window, you’ll see a list of your devices. The Arduino Uno will appear on the list with ayellow exclamation mark icon over it to show that the device has not been installed properly. Right clickon this and choose Update Driver. Choose “No, not this time” from the first page and click next. Thenchoose “Install from a list or specific location (Advanced)” and click next again. Now click the “Includethis location in the search” and click Browse. Navigate to the Drivers folder of the unzipped Arduino IDEand click Next. Windows will install the driver and you can then click the Finish button.The Arduino Uno will now appear under Ports in the device list and will show you the port numberassigned to it (e.g. COM6). To open the IDE double-click the Arduino icon in its folder


Read More

What Exactly is an Arduino? 3rd post

Posted by rinson

The Arduino can also be extended with the use of shields, which are circuit boards containing otherdevices (e.g. GPS receivers, LCD Displays, Ethernet modules, etc.) that you can simply connect to the topof your Arduino to get extra functionality. Shields also extend the pins to the top of its own circuit boardso you still have access to all of them. You don’t have to use a shield if you don’t want to; you can make
the exact same circuitry using a breadboard, Stripboard, Veroboard, or by making your own PCB. Mostof the projects in this book are made using circuits on a breadboard.
There are many different variants of the Arduino. The latest version is the Arduino Uno. Theprevious version, the very popular Duemilanove (Italian for 2009), is the board you will most likely seebeing used in the vast majority of Arduino projects across the Internet. You can also get Mini, Nano, andBluetooth variations of the Arduino. Another new addition to the product line is the Arduino Mega 2560;
it offers increased memory and number of I/O pins. The new boards use a new bootloader calledOptiboot, which frees up another 1.5k of flash memory and enables faster boot up.Probably the most versatile Arduino, and hence the reason it is the most popular, is the Uno, or itspredecessor, the Duemilanove. This is because it uses a standard 28-pin chip attached to an IC(Integrated Circuit) socket. The beauty of this system is that if you make something with an Arduino andthen want to turn it into something permanent, instead of using a relatively expensive Arduino board,
you can simply pop the chip out of the board and place it into your own circuit board in your customdevice. By doing so, you have made a custom embedded device, which is really cool.Then, for a couple of quid or bucks, you can replace the AVR chip in your Arduino with a new one.Note that the chip must be pre-programmed with the Arduino Bootloader (software programmed ontochip to enable it to be used with the Arduino IDE), but you can either purchase an AVR Programmerto burn the bootloader yourself or you can buy a chip ready programmed; most of the Arduino partssuppliers provide these. It is also possible to program a chip using a second Arduino; instructions are
available online for this.
Read More

What Exactly is an Arduino? 2nd post

Posted by rinson

The Arduino board is made up of an Atmel AVR Microprocessor, a crystal or oscillator (a crude clockthat sends time pulses at a specified frequency to enable it to operate at the correct speed), and a 5-voltlinear regulator. Depending on what type of Arduino you have, it may also have a USB socket to connectto a PC or Mac for uploading or retrieving data. The board exposes the microcontroller’s I/O(input/output) pins so that you can connect those pins to other circuits or to sensors.The latest Arduino board, the Uno, differs from the previous versions of the Arduino in that it doesnot use the FTDI USB-to-serial driver chip. Instead, it uses an Atmega8U2 programmed as a USB-toserial
converter. This gives the board several advantages over its predecessor, the Duemilanove. First,the Atmega chip is a lot cheaper than the FTDI chip, bringing the prices of the boards down. Secondly,and most importantly, it enables the USB chip to have its firmware reflashed to make the Arduino showup on your PC as another device, such as a mouse or game controller. This opens up a whole array ofnew uses for the Arduino. Unfortunately, moving over to this new USB chip has made it a lot more
difficult for clone manufacturers to make Arduino Uno clones.To program the Arduino (make it do what you want it to) you use the Arduino IDE (Integrated
Development Environment), which is a piece of free software in which you write code in the languagethat the Arduino understands (a language called C). The IDE lets you to write a computer program, whichis a set of step-by-step instructions that you then upload to the Arduino. Your Arduino will then carryout these instructions and interact with whatever you have connected to it. In the Arduino world,programs are known as sketches.The Arduino hardware and software are both open source, which means that the code, schematics,design, etc. can be taken freely by anyone to do what they like with them. Hence, there are many cloneboards and other Arduino-based boards available to purchase or to make from a schematic. Indeed,there is nothing stopping you from purchasing the appropriate components and making your ownArduino on a breadboard or on your own homemade PCB (Printed Circuit Board). The only caveat thatthe Arduino team imposes is that you cannot use the word “Arduino.” This name is reserved for theofficial board. Hence, the clone boards have names such as Freeduino, Roboduino, etc.
As the designs are open source, any clone board is 100% compatible with the Arduino and therefore any software, hardware, shields, etc. will also be 100% compatible with a genuine Arduino.
Read More

What Exactly is an Arduino ?

Posted by rinson

Figure 1-1. An Arduino Uno


Wikipedia states “An Arduino is a single-board microcontroller and a software suite for programming it.The hardware consists of a simple open hardware design for the controller with an Atmel AVR processorand on-board I/O support. The software consists of a standard programming language and the boot loader
that runs on the board.”To put that in layman’s terms, an Arduino is a tiny computer that you can program to process inputs
and outputs between the device and external components you connect to it (see Figure 1-1). TheArduino is what is known as a Physical or Embedded Computing platform, which means that it is aninteractive system that can interact with its environment through the use of hardware and software. Forexample, a simple use of an Arduino would be to turn a light on for a set period of time, let’s say 30seconds, after a button has been pressed. In this example, the Arduino would have a lamp and a button
connected to it. The Arduino would sit patiently waiting for the button to be pressed; once pressed, theArduino would turn the lamp on and start counting. Once it had counted for 30 seconds, it would turnthe lamp off and then wait for another button press. You could use this setup to control a lamp in ancloset, for example.You could extend this concept by connecting a sensor, such as a PIR, to turn the lamp on when ithas been triggered. These are some simple examples of how you could use an Arduino.
The Arduino can be used to develop stand-alone interactive objects or it can be connected to acomputer, a network, or even the Internet to retrieve and send data to and from the Arduino and thenon that data. In other words, it can send a set of data received from some sensors to a website, whichcan then be displayed in the form of a graph.The Arduino can be connected to LEDs, dot matrix displays (see Figure 1-2), buttons,switches,motors, temperature sensors, pressure sensors, distance sensors, GPS receivers, Ethernet modules, orjust about anything that outputs data or can be controlled. A look around the Internet will bring up awealth of projects where an Arduino has been used to read data from or control an amazing array of devices.
Read More

Introduction To Arduino Project

Posted by rinson

Since the Arduino Project started back in 2005, over 150,000 boards have been sold worldwide to date.
The number of unofficial clone boards sold no doubt outweighs the official boards, thus it’s likely that
over half a million Arduino boards and its variants are out in the wild. Its popularity is ever increasing as
more and more people realize the amazing potential of this incredible open source project to create cool
projects quickly and easily with a relatively shallow learning curve
The biggest advantage of the Arduino over other microcontroller development platforms is its ease
of use; non-“techie” people can pick up the basics and be creating their own projects in a relatively short
amount of time. Artists, in particular, seem to find it the ideal way to create interactive works of art
quickly and without specialist knowledge of electronics. There is a huge community of people using
Arduinos and sharing their code and circuit diagrams for others to copy and modify. The majority of this
community is also very willing to help others. You’ll find the Arduino Forum the place to go if you want
answers quickly.
However, despite the huge amount of information available to beginners on the Internet, most of it
is spread across various sources, making it tricky to track down the necessary information. This is where
this book fits in. Within these pages are 50 projects that are all designed to take you step by step through
programming your Arduino. When you first get an Arduino (or any new gadget, for that matter), you
want to plug it in, connect an LED, and get it flashing right away. You don’t want to read through pages
of theory first. This author understands that excitement to “get going” and that is why you will dive right
into connecting things to your Arduino, uploading code, and getting on with it. This is, I believe, the best
way to learn a subject and especially a subject such as Physical Computing, which is what the Arduino is
all about.
How to
Read More

About Arduino'S BIRTH

Posted by rinson


Michael McRoberts discovered the Arduino in 2008 while looking forways to connect a temperature sensor to a PC to make a Cloud Detectorfor his other hobby of astrophotography. After a bit of research, the Arduinoseemed like the obvious choice, and the Cloud Detector was successfullymade, quickly and cheaply. Mike’s fascination with the Arduino had begun.Since then he has gone on to make countless projects using the Arduino.
He had also founded an Arduino starter kit and component online businesscalled Earthshine Electronics. His next project is to use an Arduino-basedcircuit to send a high altitude balloon up to the edge of space to takestills and video for the heck of it, with the help of the guys from UKHASand CUSF.
Mike’s hobby of electronics began as a child when the 100-in-1 electronics kits from Radio Shackmade up his Christmas present list. He started programming as a hobby when he obtained a SinclairZX81 computer as a teenager. Since then, he’s never been without a computer. Recently, he’s become aMac convert.
He is a member of London Hackspace and  the OrpingtonAstronomical Society and can regularly be
found contributing to the Arduino Forum. He also likes to lurk on IRC in the Arduino, high altitude andlondon-hack-space channels (as “earthshine”), and on Twitter as “TheArduinoGuy.” When he is notmessing around with Arduinos or running Earthshine Electronics, he likes to indulge in astronomy,
astrophotography, motorcycling, and sailing.

Read More